Tara’s Talons Giveaway Shortlist!

The Tara’s Talons giveaway shortlist is up and I’m thrilled to say that the Braw Claws Loves Tara’s Talons series has made the cut!

IMG_20150201_132224

As I’ve said, I really really enjoyed participating in this giveaway but it would be the icing on the cake to win a whole new bunch of Tara’s Talons polishes to create more wonderful manis with!

It’s public vote time and the final closing date is noon on February 9th – click here to view all three final entries and vote for your favourite.

Click here to follow Tara’s Talons on Instagram and keep up to date with offers and giveaways.

Braw Claws Loves Tara’s Talons ‘Holographic Topcoat’

Here’s another Braw Claws Loves Tara’s Talons post and this one will most likely be the last in my series of entries (unless I can squeeze another cheeky one in before the closing date – that’s February 1st if you’re wondering!)

This one goes out to the ultimate holographic polish – Tara’s Talons Holographic Topcoat. This is most definitely the most wearable and versatile polish I own – it looks beautiful worn alone or over pretty much any colour of polish, taking the base colour to the highest of rainbow-ey, glittery heights! I value my holo topcoat stash so much that I own the whole family – a 5ml, 10ml and my prized GIANT bottle (I think it’s 4oz, which is a little over 100ml!) – obsessive? YES. I’m not ashamed to admit it: I’m Emma and I am a Tara’s Talons holo-aholic.

I really liked the idea of doing some negative space nail art with a few coats of this baby but my fine striping tape was too fiddly and I couldn’t be doing with the stress (PS if anyone has any helpful tips about using fine tape feel free to pop them into the comments below ;)) so I painted three coats (because I’m glitter-greedy!) and waited for inspiration to smack me in the face.

IMG_20150125_110456_edit

(one coat, dull light, flash)

IMG_20150125_111427_edit

(two coats, dull light, flash)

IMG_20150125_113620_edit

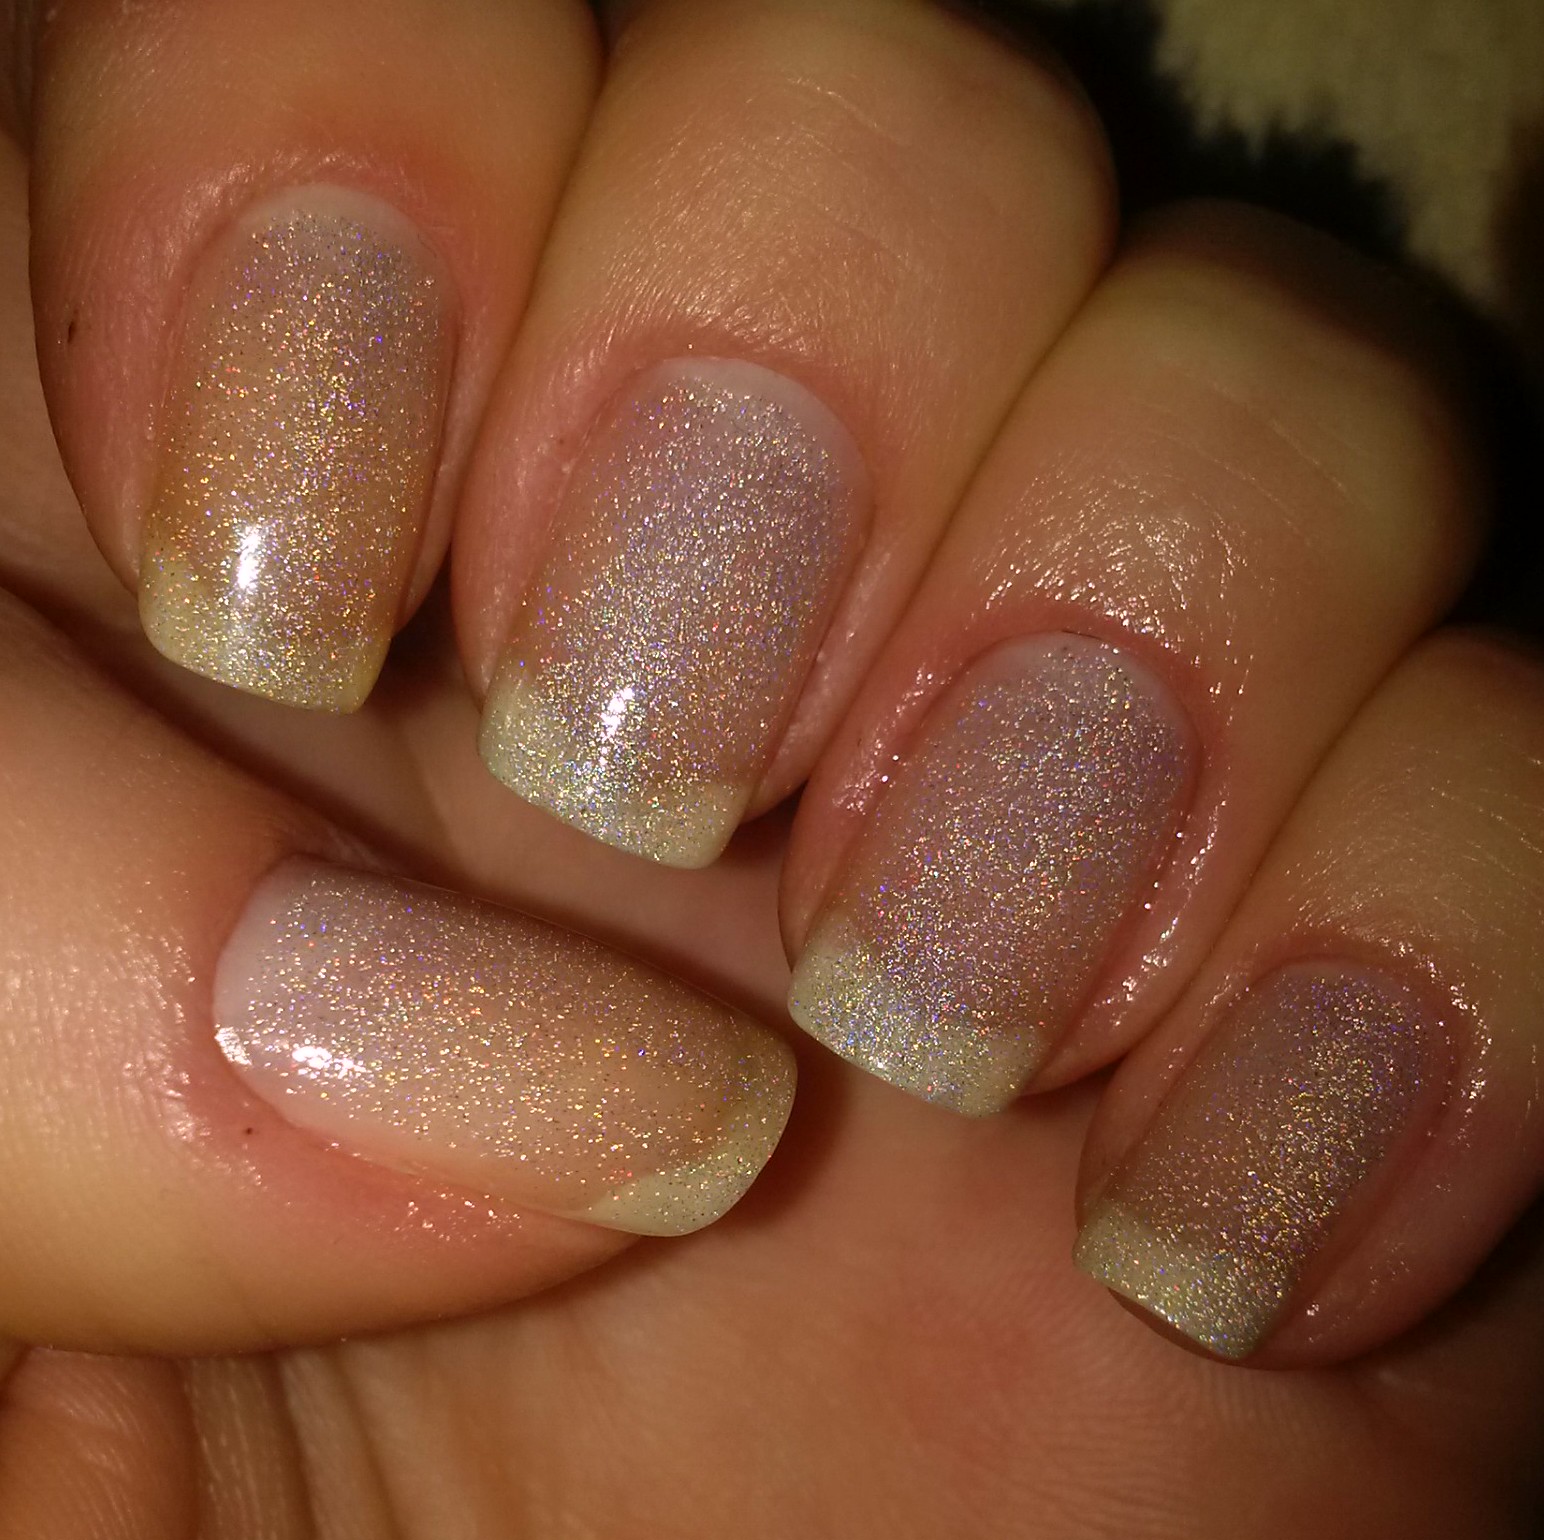
(three coats under home halogen bulb, no flash)

IMG_20150125_113633_edit

(three coats, dull light, flash)

As you can see, one coat is plenty, particularly if you use your holo topcoat over a base colour and two is pretty perfect. But, as I’ve proven before, I can’t help myself and three coats gives an utterly devine shimmer. And unsurprisingly, it’s up to the usual Tara Talons polish standard: easy application, quick dry time and fab quality!

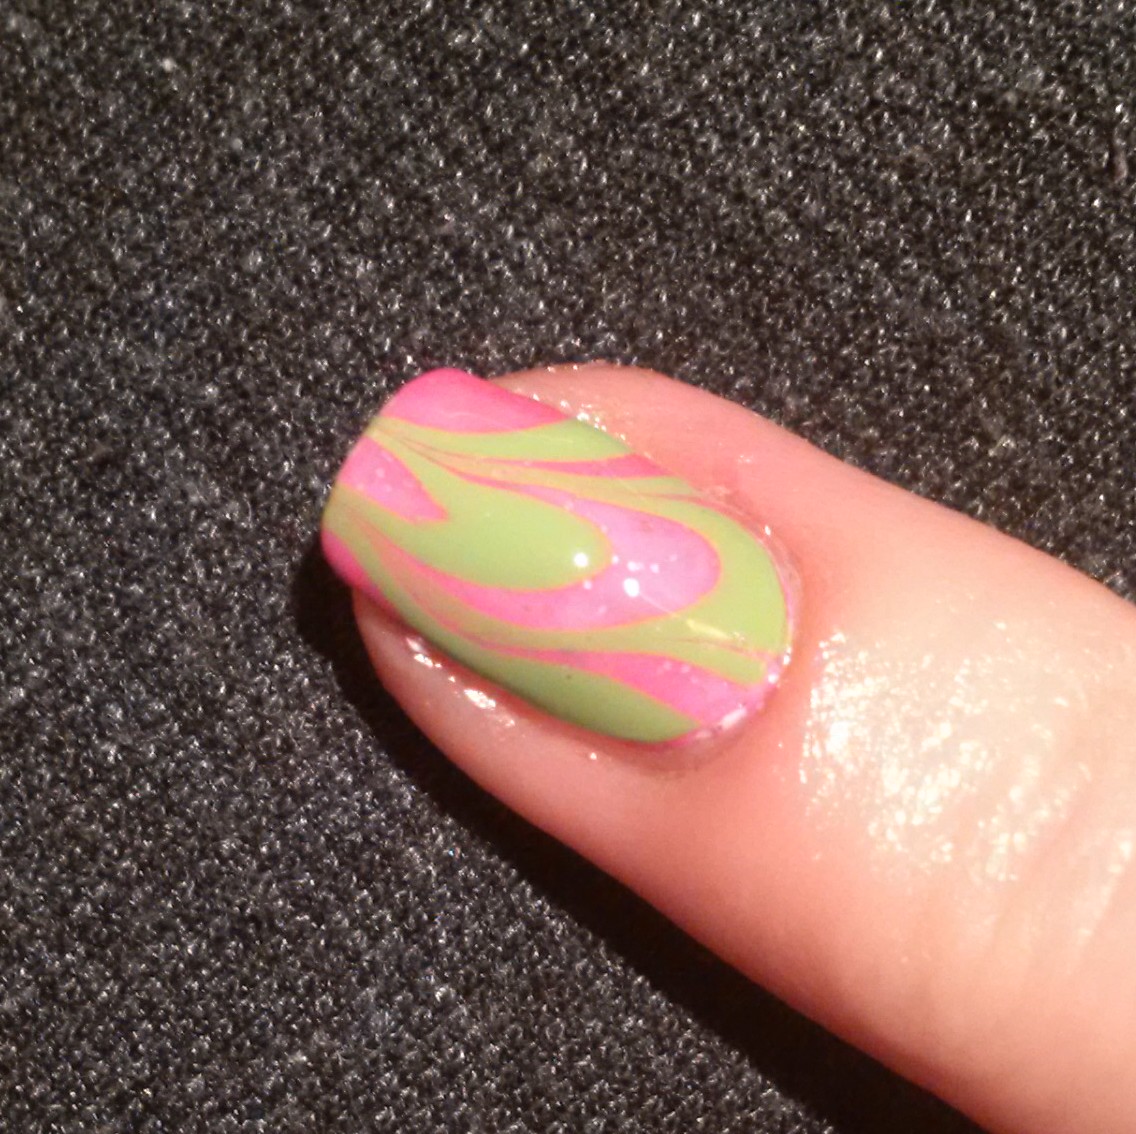
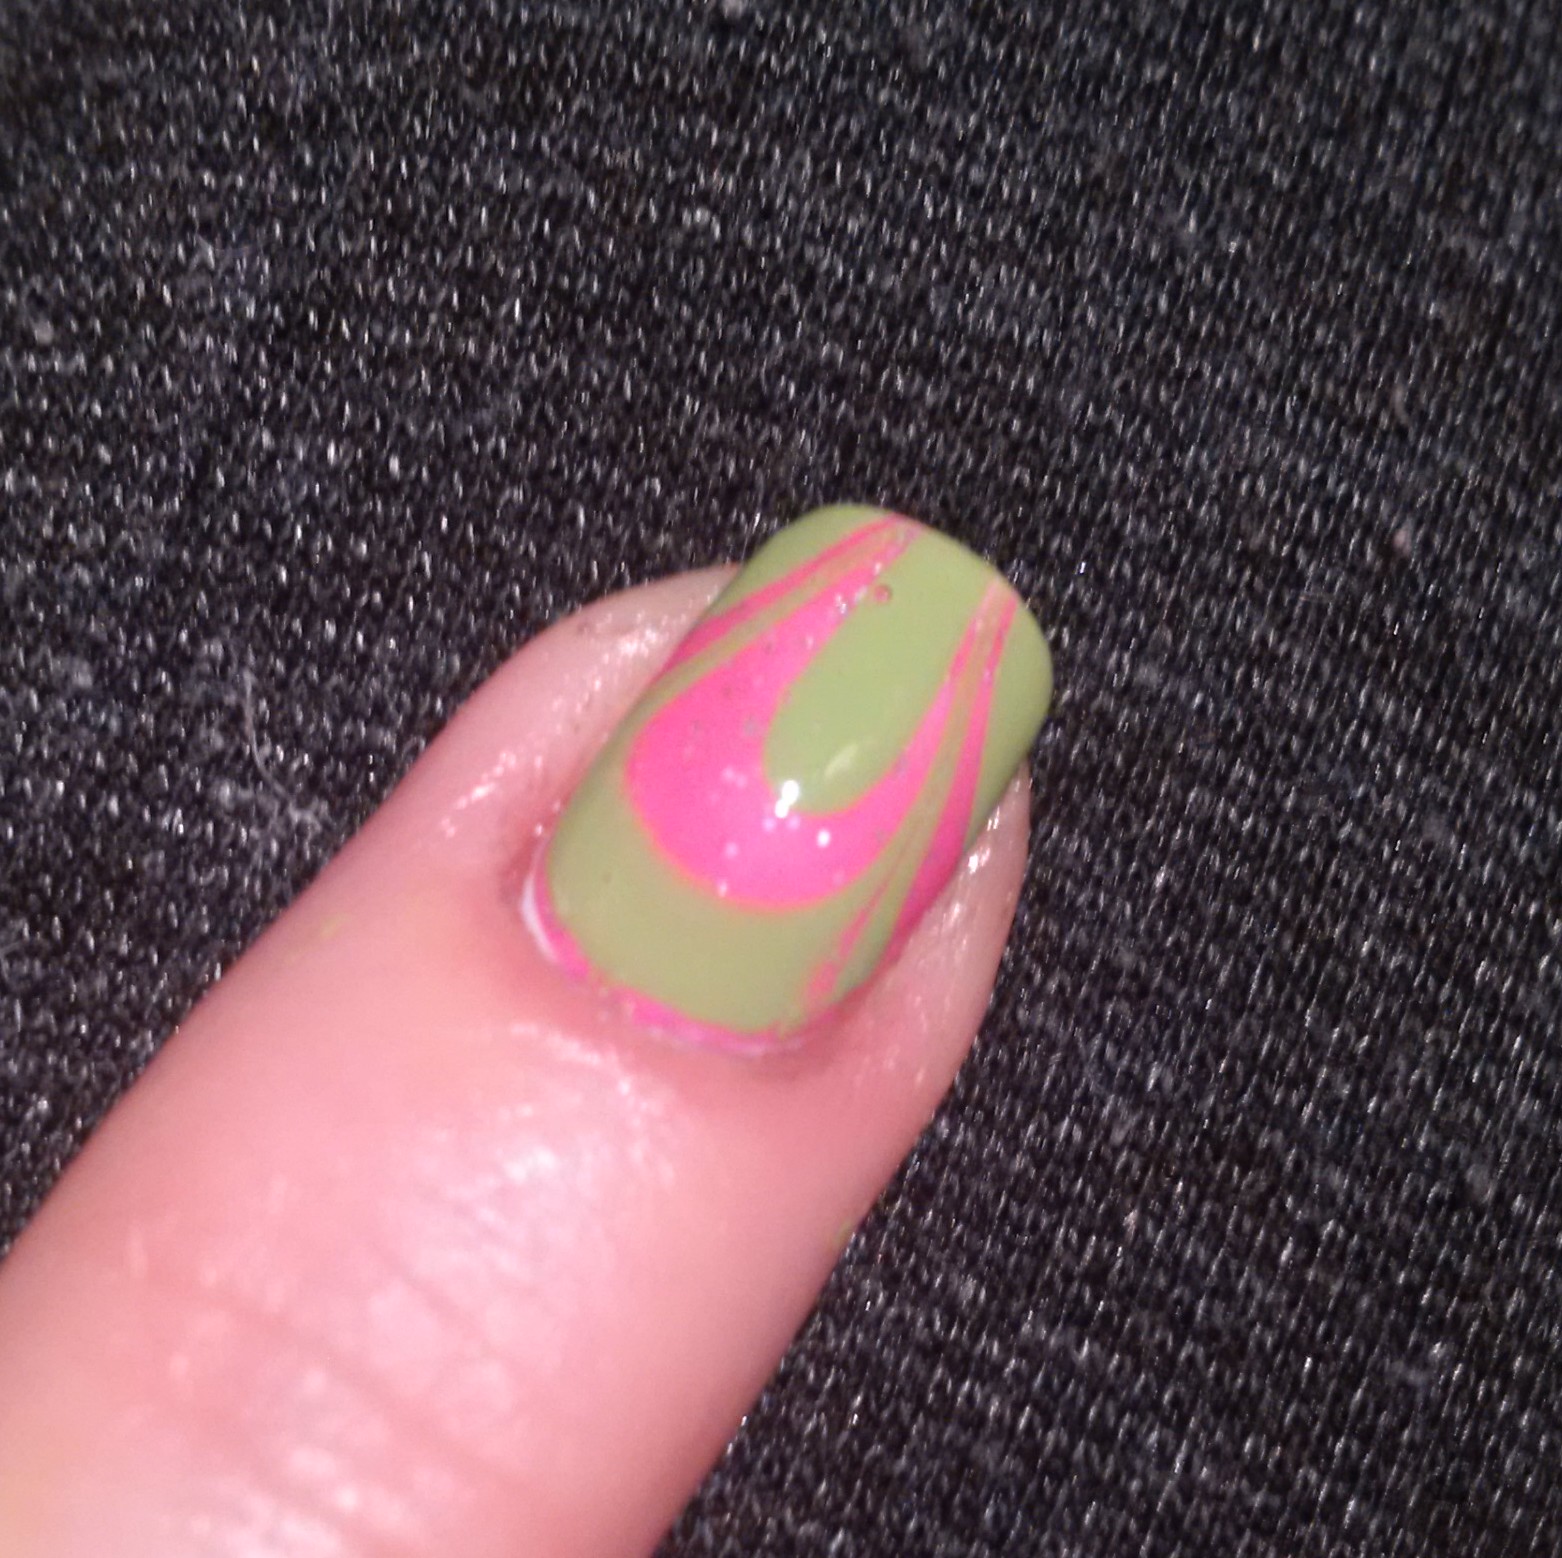
I eventually stuck with my negative space idea but in a reverse, flipped around, upside down kinda way. I stamped each nail using my MoYou Sailor 5 plate and alternating between Barry M Gellys in Grapefruit and Kiwi, added topcoat (okay, maybe two…again because I’m greedy but also, I’m not sure if it really does but it seems to make things even shinier) a really, really good clean up with acetone and a fine brush and I’m all done. I’m quite chuffed with my stamping progress – confidence seems to be key so I’m going with it!

IMG_20150125_184353_edit

(dull light, flash)

IMG_20150125_184439_edit

(dull light, flash)

Be prepared for quite a few pictures, I wanted to catch these in different lights and the holo base is so pretty I AGAIN have no restraint and cannot, caaaaannot help showing these sparklies off 😀

IMG_20150126_082435_edit

(dull light, outdoors, no flash)

IMG_20150126_082453_edit

(dull light, outdoors, no flash)

IMG_20150126_121107_edit

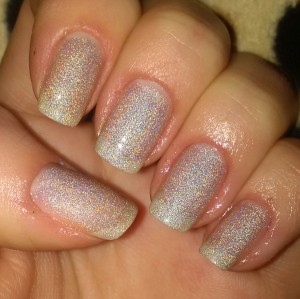
(bright light, outdoors, no flash)

IMG_20150126_121103_edit

(bright light, outdoors, no flash, close up)

Click here to find out how you could be in with a chance of winning a Tara’s Talons haul of polish and goodies!

Click here to follow Tara’s Talons on Instagram.

Click here to browse Tara’s Talons Etsy store.

Click here to browse MoYou London stamping plates and accessories.

Click here to browse Barry M nail polish and accessories.

Braw Claws Loves Tara’s Talons ‘Jelly Shoes’

Aaaaand it’s another Braw Claws Loves Tara’s Talons post! I’m starting to build up a little bank of entries and there’s still just under a fortnight left to get involved with the Tara’s Talons giveaway.

I’ve set myself a little challenge to use one of my Tara polishes for every mani I create until the closing date and I’m really enjoying the whole experience – I find it hard to set my creative side free and this has forced me into it – another reason why I love Tara’s Talons polish!

My polish choice this time is inspired by the whole creativity feeling as a kind of “thank you!” to Tara for inspiring me to push myself to be more free (and giving me a good excuse to post as much as I can!).
I’ve opted for ‘Jelly Shoes’ – I loved mine when I was a little girl (and really had to try not to buy a pair when they started popping up again!)
This delightful creamy pink polish dotted with sparkly silver glitter is a match for the ones I had so I couldn’t resist it. I feel like I’m repeating myself but it’s true – fab formula; applies easily; dries in no time. Gaaaah I looooooove Tara’s Talons! Every polish is consistently AWESOME 😀

I really wanted to try to watermarble ‘Jelly Shoes’ with Barry M Gelly in Key Lime so I got everything organised and prepped my nails (click here to find out about more about watermarbling in my original post).

I’m sad to say my experiment didn’t work out BUT I will say that considering the glitter type and content I was impressed by how well it stood up to the challenge. ‘Jelly Shoes’ sat happily on the surface of the water – both glitter and polish – at first but the motion of the water and the size of the glitter caused small rings to break up around the glitter pieces. I’ll definitely try again with this polish though, I think the ring effect would turn out quite nicely and I’m intrigued to find out.

I had my heart set on using this technique and these two polishes so I improvised – I painted one coat of ‘Jelly Shoes’ over my white base and let it dry, then I watermarbled Barry M Key Lime with a clear polish and transferred my pattern over the Tara’s Talons base.

IMG_20150119_104114_edit

IMG_20150119_104158_edit

I really love how it came out – the colour combination is fantastic (if I do say so myself) – and I can’t believe how bright and glittery just one coat of ‘Jelly Shoes’ came out!

IMG_20150118_230218_edit

IMG_20150118_230040_edit

Click here to find out how you could be in with a chance of winning a Tara’s Talons haul of polish and goodies!

Click here to follow Tara’s Talons on Instagram.

Click here to browse Tara’s Talons Etsy store.

Braw Claws Loves Tara’s Talons ‘Phillip’

Here’s another Braw Claws Loves Tara’s Talons post – have you entered Tara’s giveaway yet? Click here to find out how to get involved!

This one – like all of them – is another beaut.

IMG_20150114_214032_edit

Introducing ‘Phillip’ – a delicious blue glitter that is so sparkly that every time I put it on I find myself getting lost, gazing into it’s glittery depths! It’s so densely glitter packed that two coats gives full coverage (but I can’t help myself and always end up doing three!)

IMG_20150114_202132_edit

(one coat under home halogen bulb)

IMG_20150114_203532_edit

(two coats under home halogen bulb)

IMG_20150114_210513_edit

(three coats under home halogen bulb)

‘Phillip’ dries to the touch in almost no time; give it another 5 – 10 minutes before pulling any risky moves though, just to be sure. As I said, two coats gives a really nice full finish but a third adds more blue and sparkle and I still have over half a bottle so while I can afford the extra coat, I shall have it!

IMG_20150115_193333_edit

(three coats under whiter lighting in my work corridor – I think it may be LED strips? I’ll try to find out!)

This is the sparkliest, prettiest polish I own making it one of my absolute favourites in my stash!

I added a little stamped pattern to the tip of my ‘Phillip’ accent nail using my MoYou London Explorer 3 plate to incorporate some nail art and finish my mani off.

IMG_20150115_233124_edit1

IMG_20150115_232837_edit

Browse Tara’s Talons Etsy store here
Browse MoYou London products here

Braw Claws Loves Taras Talons ‘Fresh’

Seeing as this is the first post of my Braw Claws Loves Tara’s Talons series I thought I should start by creating a mani with the polish that prompted me to make my first ever Tara’s Talons purchase.
I spotted a swatch of ‘Fresh’ on Instagram last year and HAD to have it. Tara was offering a pick and mix bag in her Etsy store at the time containing four 10ml polishes of your choice for £20 plus she was offering a 15% discount code to her followers (something she does frequently on social media so click here to keep up to date with Tara’s Instagram account) – I’m a sucker for a bargain! ‘Fresh’ was top of my list and my addiction to Tara’s Talons had begun.
‘Fresh’ is a creamy nude base jam packed with neon shapes in all sizes – dots, hexes and squares galore! It’s a party in a bottle, cupcakes and sweeties and all the pretty! As I’ve found with most of my Tara collection, ‘Fresh’ dries quickly – by the time I finish painting my second hand the first is pretty much fully dry – and it applies well. One coat gives a really light and subtle nude base coverage with plenty of bright pops of neon colour dotted around. Use two coats for a full base coverage and a “glitter sandwich”-ish effect.

IMG_20150111_135211_edit

(one coat under home halogen bulb – please excuse any patchy bits, I was rushing as usual!)

I’ve learned through experience that applying glitter polishes is slightly different to applying regular polish (it’s logical really, when you take the differences in consistency into account). I apply glitter polish by painting my nail using the regular two/three stroke method to get base coverage, then I dab the now slightly drier but still glitter-packed brush onto the wet polish on my nail to maximise the glitter coverage on top.

IMG_20150111_161633_edit1

(home halogen bulb)

I painted a base coat – keep your eyes peeled for more details in a later post 😉 – and allowed it to dry. I used two coats of ‘Fresh’ as my base colour and a nail art pen striper brush in white to create a triangle at the tip of my nail. Then, I carefully applied two coats of Barry M Nail Paint in Berry Lilac from the base of my nail out towards the edges to block out my base in the area around the triangle. After allowing this to dry, I repainted the white lines of the triangle tip to define the area and used the dotting nib end of the nail art pen to add dots. Topcoat, as always, to finish it all off 😀

IMG_20150111_161713_edit

(home halogen bulb)

To find out more about the Tara’s Talons giveaway click here
Browse Tara’s Talons Etsy store here
Shop Barry M polishes here

Tara’s Talons Giveaway

Tara’s having a giveaway! All you have to do to be in with a chance of winning is show your love for Tara’s Talons through social media – your Instagram, Twitter, Facebook or even your blog. Tara will choose her three favourite entries on February 1st at noon then the three favourites will be placed into a public vote on Tara’s blog. Whoever has the most votes by noon on February 9th will win a haul of eight 10ml and two 5ml Tara’s Talons polishes, nail art bits and pieces and extra goodies! You can find all the details on how to enter by clicking here.

IMG_20150105_201357_edit

To show my love, I’ll be posting a special series of manis featuring polishes from my sacred Tara stash! Follow my blog or click here to follow my Instagram and keep up to date with my Braw Claws Loves Tara’s Talons posts.

Good luck!

Follow Tara’s Talons on Instagram here

Visit Tara’s Talons blog here

Visit my first Braw Claws Loves Tara’s Talons post here

Sexy Sheer NYE Nails

Happy New Year! And Merry Christmas and all the general seasonal greetings that I missed out on online! I hope you all had a fab time and Santa spoiled you all rotten – I know he certainly spoiled me. I got pretty much the entire “basics” of OPI nail care – Chip Skip, Nail Envy, Rapid Dry and their fantastic REFILLABLE Corrector Pen. And quite a few lovely little extras too!
My festive holidays have been pretty hectic with lots of last minute buying, wrapping, visiting and eating – and a few shifts in between – so I haven’t had a lot of free time to jazz up my nails or post anything of any interest but I’m back with a little rundown of these awesome sheer painted nails that took me from 2014 into 2015 looking like the classy lady that I am (despite the few too many glasses of vino!) 😉

IMG_20150101_172825_edit
These were inspired by a picture that popped up on my Instagram feed but I can’t for the life of me remember who posted it! Sorry!

You’ll need:

  • An old half used clear polish
  • Black polish
  • Thin nail art brush
  • Dotting tool

Make your sheer polish. I wasn’t sure it could be as simple as just adding some black to clear so I searched YouTube just to make sure and came across a clip by ShelsLaMarie – click here to view the video – and it really is! I started with four or five drops for I’d say between 6-7ml of clear polish, shaked it up, then tested it on a nail wheel to check the opacity. I ended up using closer to 10-12 drops but the number of drops needed will vary quite a bit so it’s wise to start slow, you can always add a little more if you need to. But, if you do use too much black don’t panic – you can save it by diluting it down with some more clear polish.

Basecoat. ’nuff said.

Apply your DIY sheer polish. I used two coats.

Allow to dry fully.

Outline your nail using the striper brush and some black polish.

Add some dots using the dotting tool and some black polish. Mine are by no means perfect – I was rushing these on New Years Eve – but I found it helps to work from the base to the tip. I started with two dots at the base and then lined up three slightly further up then back to two, then three…you get the jist.

TIP: As there is a bit of intricate painting involved here, I completed the design on one hand and allowed it to dry fully before working on the other hand. Although it takes a bit more time it really helps to prevent smudging all your hard work.

Allow to dry fully.

Topcoat to seal in, smooth out and give shine to your pretty nails.

What were your nails wearing for New Years Eve? #brawclaws on Instagram to show me!

Freckles CYO Polish Kit

Create my own polish? Yes please!
I’ve been following a newly discovered UK based indie brand Freckles Polish and whilst having a browse through their Etsy store I came across the ultimate item on my indie polish wish list – a ‘create your own’ polish kit.

IMG_20141125_184605_edit
The kit comes with pretty much everything you need to dip your toe into the world of frankening – stirring sticks, false nails for colour and consistency testing and the most adorable teeny tiny scoop and funnel. I opted for the larger of the two kits which came with two 10ml bottles and two 5ml bottles pre-filled with suspension base, three bags of mica pigment and four bags of glitters of my own choosing – all for only £15.99!

I’ve often thought about mixing up my own polishes but after some investigation I found that it can be quite hard to find the supplies needed in small, hobby-not-business quantities. This kit is PERFECT for anyone interested in having a go at making their own polish but not so interested in spending a small fortune doing so – it would also make an amazing gift or stocking filler for any crazy nail ladies you might know!

By some miraculous coincidence, the lovely Tara of Tara’s Talons was having an amazing destash sale of lots of powders and glitters that she had accumulated while creating her beautiful indie gems the day after I ordered my Freckles kit so I nabbed a £5 mixed pack and was over the moon to open my envelope and find many many more bags than I had expected. I’m sure Tara may still have some left over so do check out her Instagram by clicking here if you want to grab some beautiful pigments and glitters for a bargain.

IMG_20141125_185348_edit_edit

(my Tara’s Talons glitter and pigment haul)

Now to actually make a polish! It is sooooooo much easier than anyone would expect – and since it’s your own, it’s pretty much impossible to get it wrong!

IMG_20141125_190307_edit
Select your powders and/or glitters. Oooooh! Shiny! I loved this bit. I found that using a little bit of cheap, clear polish to mix mica pigment into a liquid form gives you a more accurate idea of the final effect that the powder will give your polish. I used ‘Peacock Blue’ mica from my Freckles kit and a gold glitter that Tara sent me.

IMG_20141125_190550_edit

IMG_20141125_190733_edit

Measure out your powders and/or glitters. Using my teeny tiny adorable mini scoop I measured out 0.25g of ‘Peacock Blue’ powder and 0.25g of gold glitter – that’s five tiny scoops of each – and placed them onto a patch of greaseproof paper. After a little research online I found that the general consensus seems to be 0.5g of powder to 10ml of polish for full opacity BUT this is a guideline, it is by no means a rule. There are no rules when it comes to mixing your own polish!

IMG_20141125_191536_edit
Add powders and/or glitters to your bottle of base. This is where the teeny tiny adorable funnel comes in! Make sure to hold it up so that it doesn’t touch the base that is already in your prefilled bottles or it will end up all clogged up and carefully tip your powders and glitters in. If I was using my own suspension base and empty bottles I would probably choose to add my powders and glitters and then add the base on top – I figure it would help everything to mix up better however, adding them in on top of the base worked well too.
Shake shake shake! Give your concoction a really, really good shake. Up and down, side to side and spinning the bottle between your hands in all directions!
Test your polish by painting a coat onto a false nail. Make sure that the consistency is good and that you have your desired opacity and finish. Mine needed a little pinch more gold glitter so I added another 0.1g.
Personalised polish! Yay!

IMG_20141203_185747_edit

IMG_20141125_195111_edit

(two coats under home halogen lightbulb which seriously doesn’t do my wee polish any justice)

I was so excited about my first bottle that I decided to whip up a Christmassy topper using white hexes from my Freckles kit and some white/blue iridescent glitter that Tara had sent me – look how pretty it is over a dark base! I can’t wait to create a mani with this baby!

IMG_20141201_230504_edit

IMG_20141201_231156_edit

(one, two and three coats from left to right under home halogen lightbulb)

Buy your own Freckles Polish CYO Polish Kit here.
Browse Freckles Polish shop here.
Follow Freckles Polish on Instagram here.

Tara’s Talons ‘Falling Leaves’

I told you I’d try really hard to post more often and I’m determined to stick to my promise!

This one is my first swatch post and it’s the beautiful ‘Falling Leaves’ by Tara’s Talons. This is a light blue creamy base containing dark glitter circles and hexes in various sizes with a subtle bronze flakie shimmer here and there. A gorgeous autumnal shade that shows you don’t have to opt for dark and heavy to bring your nails into the new season!

IMG_20141031_201601_edit

(home halogen lightbulb)

Tara is a fabulous indie polish maker and blogger based in the UK and I am a huuuuge fan.

When I first started to get passionate about nails and discovered that there were people out there making their own indie nail polishes I was instantly obsessed. There are many brands out there doing their own thing and doing it very well but unfortunately, I’m far too stingy for the US shipping for the time being. In my search for an indie that lived closer to home I came across Tara’s Talons.

I bought my first Tara’s Talons polishes earlier this year and quickly fell in love – high quality, 5-free (see below for a quick explanation if you aren’t familiar with this term) and a great choice of shades ranging from downright quirky and bold to the classics with a twist. On top of all that, I’ve yet to receive a package from Tara that doesn’t have a lovely little added bonus alongside my beautifully wrapped, pretty new polishes!

Every single time I wear a Tara’s Talons polish, I get compliments about it’s beauty and originality – this is definitely a unique indie brand that everyone needs in their stash!

Browse and buy Tara’s Talons polishes here
Check out Tara’s blog here
Follow Tara’s Talons on Instagram here

(5-free means that Tara’s polishes contain absolutely no Dibutyl Phthalate (DBP), Toluene, Formaldehyde, Formaldehyde Resin or Camphor whatsoever. These are some pretty nasty chemicals that have all sorts of horrible side effects so YAY for 5-free!)